Using Account Matching
In collections, it is a common inventory management strategy to
utilize account grouping to centralize multiple debts pertaining
to single debtors. A debtor for grouping consideration may be
a single individual, family members, spouse accounts, corporate
accounts with the same owner, etc. Grouping optimizes a collector's
efficiency because they have access to a consolidated Group Tab which
provides summary details and grand totals for all accounts in the
Group. Additionally, they are easily able to toggle between
individual accounts within the Group for exact details on a
per debt basis.
In Collect!, accounts are Grouped by automated
processes according to preset criteria and preferences in your
Account Matching Setup window and/or by manually joining a
select number of accounts.
Ensure you have filled out your global preferences and criteria
in "System\Preferences\ Plans and Reference Tables\ Account Matching
Setup" before attempting to launch an automated grouping process.
This Setup will contain all the behaviours and field comparisons
you wish to base your grouping strength on. Collect! ships with
some of the most common settings preset for you, however, these should
be reviewed by each site before going live to ensure any specific
and/or unique requirements are being addressed in the settings.
The automated processes compare new accounts entering your
database and compares them to pre-existing inventory as a function
of the "Check" preferences when individual accounts are being
manually data entered and to the field combinations selected in the
"Advanced Match Conditions" when it is a volume of accounts being
processed in batch.
 If you change your Account Matching settings at any
time, these will be go forward changes and will
not retroactively affect Member Setups within
existing debtors already in groups. If you
make a change that needs to be retroactively
updated to existing Group Members, please contact
Technical Services for a consult on how to
best achieve your result with the least amount of
manual manipulation. A small, custom utility
Writebacks will likely be all that you require.
If you change your Account Matching settings at any
time, these will be go forward changes and will
not retroactively affect Member Setups within
existing debtors already in groups. If you
make a change that needs to be retroactively
updated to existing Group Members, please contact
Technical Services for a consult on how to
best achieve your result with the least amount of
manual manipulation. A small, custom utility
Writebacks will likely be all that you require.
There are three ways by which accounts can become successfully matched
to existing inventory.
Account Matching During Data Entry
For this capability to function, you must have checked one or more
of the switches under the category "Check" in preferences already
entered into your "System\Preferences\ Plans and Reference Tables\Account
Matching Setup" window.
 WARNING: The Check feature of account matching looks for
any 'near' matches to provide a wide margin of
possibilities. You may wish to streamline your
entry and allow only reliable matches under
Batch Processing, leaving the "Check and prompt
on near matches" area of Setup blank. This will
prevent your employees from being inundated with
irrelevant data and mitigate grouping errors as
the system in batch mode will ONLY consider the
conditional criteria in your Setup being exact
matches, not near matches.
WARNING: The Check feature of account matching looks for
any 'near' matches to provide a wide margin of
possibilities. You may wish to streamline your
entry and allow only reliable matches under
Batch Processing, leaving the "Check and prompt
on near matches" area of Setup blank. This will
prevent your employees from being inundated with
irrelevant data and mitigate grouping errors as
the system in batch mode will ONLY consider the
conditional criteria in your Setup being exact
matches, not near matches.
If you are using Check settings, then when an Operator is manually
data entering accounts, they will be presented with a popup list of
" Matching Accounts" as they press Tab or Enter to navigate to the
next field. The Operator will be presented with a single line of
fields from one or more existing accounts to compare and decision if
the new account seems to be the same debtor.

Selecting Group Accounts Together
If it is decided that the new account is the same debtor as another
existing account, then clicking Select will add this new debtor to the
existing one or more accounts for the same person.
Debtor Group Button Highlighted
If it is decided it is not the same debtor, click the Cancel button
instead on the Matching Accounts popup and continue to data enter
into the next field as normal.
Every field you turn ON under the "Check" category of
Setup increases the time it takes to manually
enter the data on a new account because for every
field you enter, it will run a comparison on the
database and create the popup of near matches. Sites
with large databases may prefer to do all grouping
via batch and none by this method.
See "Account Matching During Data Entry" for details and screenshots
of this first method.

Account Matching Using Batch Processing
For this capability to function, you must have selected one or more
fields under the category "Advanced Match Conditions" in settings already
entered into your "System\Preferences\ Plans and Reference Tables\Account
Matching Setup" window.
The automated matching process can take a tagged list of
accounts and with both time efficiency and accuracy, decision
which accounts if any should be grouped with other debtor accounts
already in the system. Whether your entry is 25 manual accounts or
thousands of Imported new accounts, gathering them into a
tagged list, then clicking "Tools\ Batch Processing" and you will
see the following:
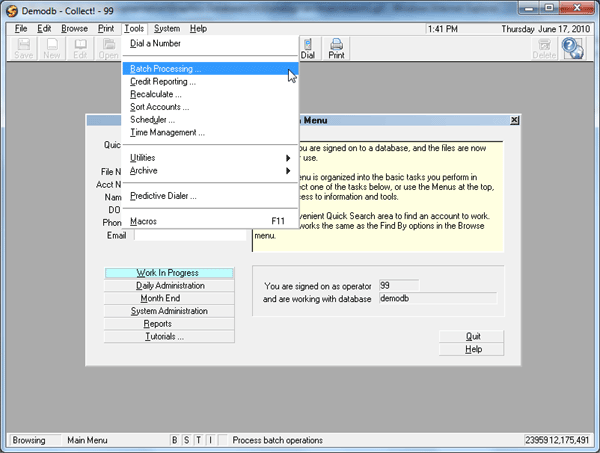
Selecting Batch Processing
Click the radio button beside " Group accounts together".
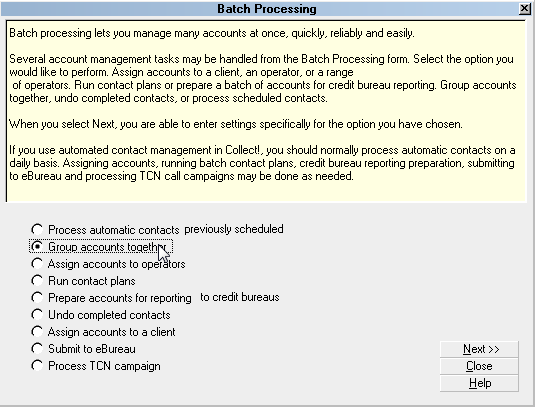
Selecting Group Accounts Together
You will see the following popup:
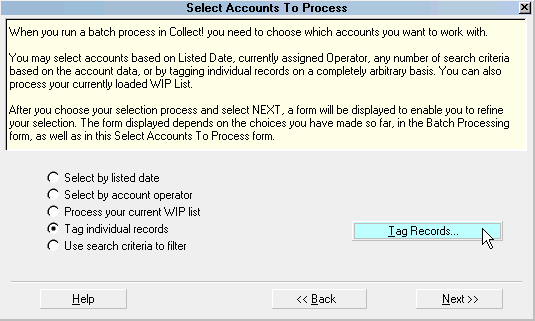
Selecting Tag Individual Records
Click the Next>> button as your tagged list will already
be acknowledged by the system.
You have been advanced to a popup displaying all your existing
Account Matching criteria. This is a fail-safe to ensure that before
running the process against the entire database, that the criteria
to be used has been verified. Each site can have their own individual
settings. The following popup is the shipping default settings and
are represented here as SAMPLE ONLY:
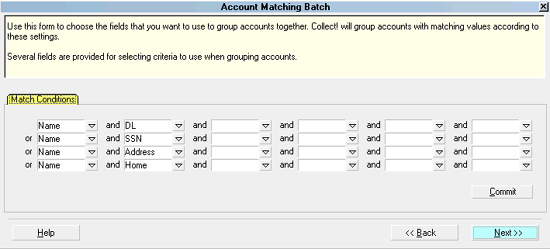
Criteria for Matching Tagged Accounts
If you do need to modify anything, you do so by selecting the
field and choosing the hyphen "-" to remove a field from the list.
When you have completed verifying your Match Condition settings, click
the Next>> button.
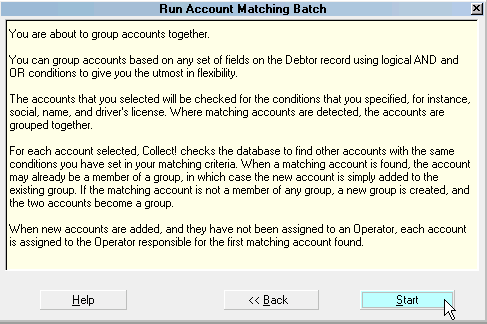
Run Account Matching Batch
Now click the Start button. The process will run and you will
receive a popup concluding that it was completed successfully and
how may records it surveyed for matching conditions:
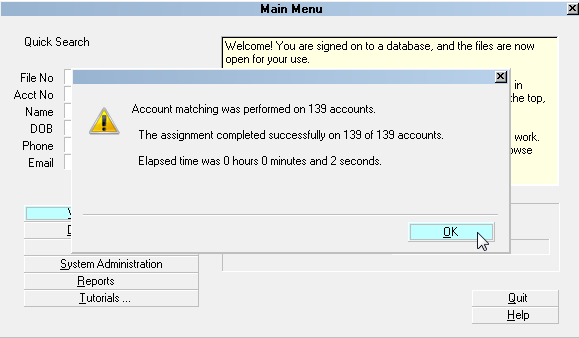
Account Matching Batch Results
Click the OK button to acknowledge and return to the Batch
Processing menu. Click the Close button in the lower right of the
screen to exit Batch Processing.
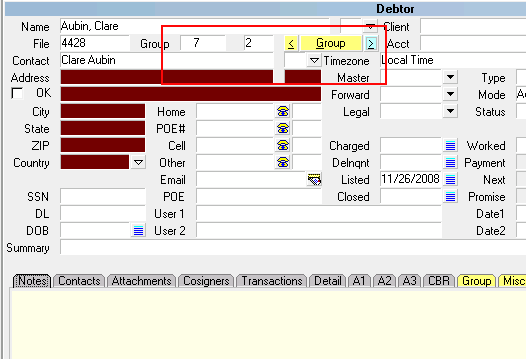
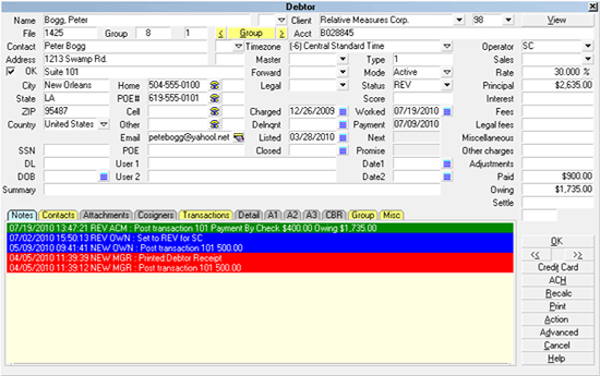
If you view one of your newly grouped accounts, you will notice that
the "Group" fields immediately to the right of the File Number are now
populated with numbers for for the Group # (system generated) and Group
Member # (this accounts sequence number of all the accounts linked in
the Group). You will also notice that the Group indicator has turned
yellow, as have the < and > toggle keys to either side of the Group
button. Additionally, you will see the Group Tab in the lower portion
of the screen has also changed to a yellow color, indicating that there
is now information in that subfile.
Debtor Group Button Highlighted
Click the Group Tab to view the list of Group Members.
Matching Accounts/Group Members
If you have data entered several batches throughout the day, either
manually or via import, you can do a single batch grouping by gathering
all the accounts listed on today's date from a Browse Active Debtor list.
Click the Find button, then enter the From/To date range (can be
same day in both) in the field called "#Listed", then click the
Search button in the lower right corner of the window. This will
create a tagged list for you. You would then close the Browse Debtor
list you were working with and go into the Tools\Batch Processing menu
to proceed with the Grouping accounts together.
If you input new accounts via an electronic Import of data, then
you already have the convenience of a Tagged List ready for Batch
Processes such as Contact Plans, Group accounts together, and Assign
accounts to operators, without having to take the step of Browsing
Active Debtors, then creating the Tagged List with Find/Search
criteria.
It is per site preference whether you wish to run Batch Processes on
your new accounts as they are input as a complete client's listing for
the day OR whether you wish to do all your new account entry for all
clients for the day followed by a single pass through batch processes
using "Browse\Active Debtors", then click the Find tile at the top
of the screen, using the Edit Search Criteria From/To #Listed date to
tag a composite list of all new accounts.
 If you will be utilizing account matching and you are
a new Collect! user, you may wish to run your
entire debtor list as a group process if your
installer hasn't already done that for you during
conversion.
If you will be utilizing account matching and you are
a new Collect! user, you may wish to run your
entire debtor list as a group process if your
installer hasn't already done that for you during
conversion.
To do this, start from a Browse Debtor list - use All if you want to
include Closed Mode in the grouping for historical purposes or use an
Active Debtor list only for this bulk initial group. Press the
keyboard keys Ctrl+A together OR click Edit, then Select All from the
menu drop-down. This will highlight and Tag all the debtors in the list.
Follow the steps above to run the grouping process against the whole
of your database.
See "Account Matching Using Batch Processing" for details and
screenshots of this second method.
Account Matching By Manual Grouping
There may be occasions when either bad data quality prevented a
group to link automatically or special conditions exist where
you need to be able to group hand-chosen accounts. Special conditions
being where the Account Matching Conditions would NOT find any matches
at all because the responsible parties on the debts are not the same
person/company. Examples are relatives who also have accounts in your
office, spouses, company owner apart from a commercial debt, different
company names but all owned by the same person etc.
This type of grouping is done while on the Debtor screen. Click the
button labeled Group to start a process of prompts and lists for you to
step through to create a new group or add the Debtor account you are on
to an existing group.
When you use this method, the new debtor's Group Member information
is set to the values existing in the Account Matching Setup window.
See How To Group Debtors for details and screenshots of this third
method.
See Also
- Matching Accounts
- Account Matching Setup
- How To Group Debtors
- How To Ungroup Debtors
- Ungroup All Debtors In Your Database
- Group Member Setup
|
Was this page helpful? Do you have any comments on this document? Can we make it better? If so how may we improve this page.
Please click this link to send us your comments: helpinfo@collect.org